 |
This is a theoretical and practical contribution to the construction of a short dipole antenna for 28.5 MHz. This paper does not claim to be complete. All information has been compiled with care. However, errors can’t be ruled out.
|
Antennas are often regarded as a mystery. They often transmit something magical to people. In general, an antenna is nothing else than a simple electrical conductor. The mathematical description and operation of an antenna is very complex. The Maxwell equations are the mathematical basis for the description of an antenna. This technical information shows how short antennas are calculated and realized.
We have symmetrical and unsymmetrical antennas. Either type has both advantages and disadvantages. An unsymmetrical rod antenna only needs one rod but an infinitely large and infinitely good conductive surface to compensate for the asymmetry. The antenna rod is placed in the center of this area, insulated from the conductive surface. It is practically impossible to realize such an infinitely large area. Compromises are not reproducible. Moving from one place to another may have completely different ground situations. The test results of an unsymmetrical antenna depend on too many unknown influences.
Therefore, I have decided to construct a short dipole antenna. The situation is much easier to reproduce with a symmetrical antenna (a short dipole).
This technical information will try to explain the theoretical background of a short dipole antenna and the practical construction of such an antenna. A dipole antenna consists of two rods equal in length. Usually each rod has the length of about a quarter wavelength. The length of a short antenna specified in [1] is
It is explained in [6], that short antennas have capacitive impedance values (Xin < 0).
1. The Antenna Model
The short antenna input impedance consists of a radiation resistance Rs, a loss resistance Rv and a capacitive component XA. Picture 1 shows the equivalent circuit network. The loss resistance can be neglected as long as it is small in relation to the radiation resistor. The estimation in accordance to [1] finds Rv < 1 Ohm. This estimation does not include the transformation loss.
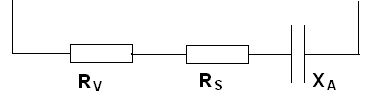 |
Picture 1: Antenna Model for Short Antennas
2. Antenna Matching
Commercial transmitters and receivers are designed having an output impedance of 50 Ohm unsymmetrical. To fulfill power matching, the connected antenna must have an impedance of 50 Ohm unsymmetrical as well. In accordance to Picture 1, a short antenna has a complex impedance. A network must match such a short antenna to the 50 Ohm unsymmetrical. This technical information also will describe the construction of the necessary matching network.
2.1 Symmetrization of the Antenna
2.1.1 BALUN with Parallel Wires
The short dipole antenna is a symmetrical antenna system. It is necessary to convert the symmetrical system into an unsymmetrical antenna system. A BALUN can do this conversion. BALUN is the abbreviation of “Balanced” and “Unbalanced”. The literature recognizes different BALUN types. The selected BALUN is described in [1]. Picture 2 illustrates the principle.
This BALUN transforms a symmetric system into an unsymmetrical system or vice versa. The BALUN was constructed as described in [1]. The BALUN consists of three coils trifilar wrapped around a toroid iron powder core. The three wires are wrapped in parallel. The inductivity of each of these coils should have at least four times the value of the connected coaxial cable in regard to the lowest frequency in use. Since we have a 50 Ohm system, the inductivity of the coil must be > 200 Ohm for the lowest frequency in use.
The BALUN was assembled in accordance to the information stated in [1]. To measure the BALUN, a 50 Ohm resistor was connected to the symmetrical connectors. The ZNB8 network analyzer was connected to the unsymmetrical connectors. ZNB8 performed a S11 measurement from 100kHz to 100MHz. Checking S11 of the 50 Ohm resistor without BALUN shows –42 dB at 3 MHz and –25 dB at 60 MHz. With BALUN S11 shows only –10 dB in the frequency range of 10 MHz to 30 MHz.
This BALUN is useless.
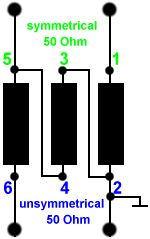 |
Picture 2: BALUN
2.1.2 BALUN with Twisted Wires
Further literature studies described and showed the BALUN exactly in the way as this one is constructed. I made another BALUN with the same structure. This time I twisted the three wires before wrapping them around the toroid. That was the solution. Picture 3 shows the result. The blue curve shows the SWR of the 50 Ohm resistor without BALUN. The red curve shows the SWR of the 50 Ohm resistor including the BALUN. Table 1 shows S11 of the 50 Ohm resistor including the BALUN in dB.
![[Image]](ant28-pics/pict39.jpg) |
Table 1: BALUN S11 at 50 Ohm
I wonder if such a BALUN really ever was measured? There was no hint in the literature to twist the three wires. All drawings and descriptions show and explain only wrapping three wires in parallel.
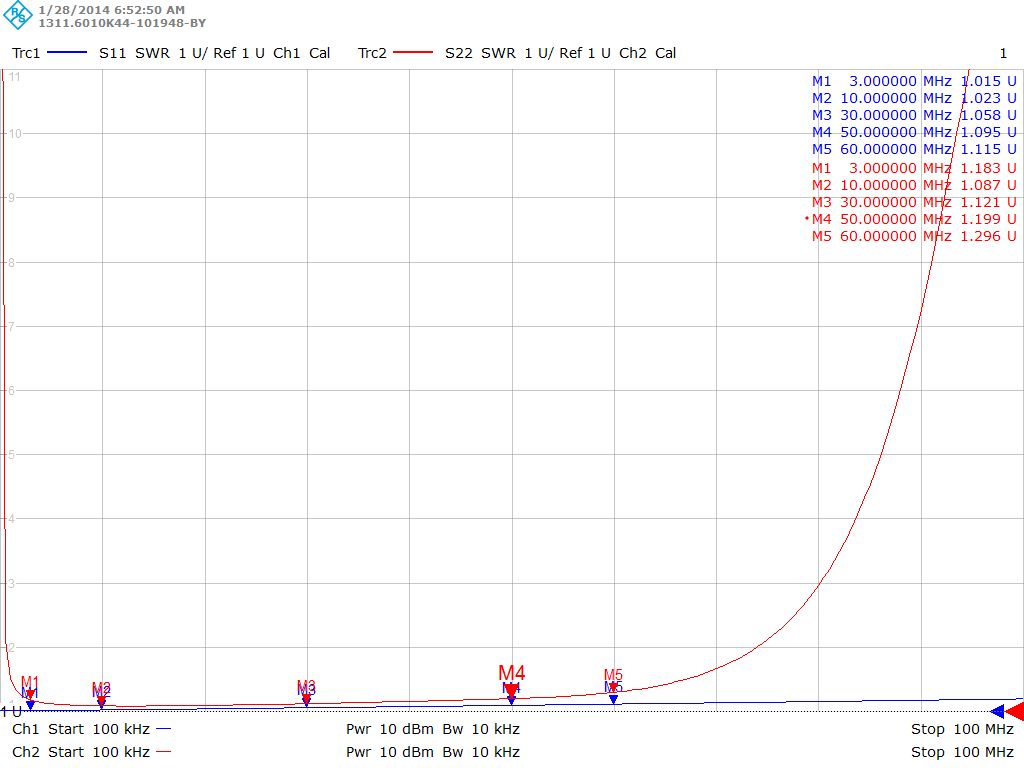 |
Picture 3: SWR BALUN matching (blue is the 50 Ohm resistor without BALUN)
2.1.3 The Coil Construction Data for this BALUN
Toroid iron powder ....: Amidon T157-6 (yellow, 10 MHz to 50 MHz)
Wire ..........................: Enameled copper wire, 3 x 0.85 mm, 19 turns twisted (length > 1.5 m)
The inductivity of the coil of > 200 Ù for the lowest frequency was calculated for frequencies starting at 10 MHz and up. In accordance to the specification in [1], this BALUN should be able to operate only from 10 MHz and up.
2.2 Antenna Calculations
2.2.1 The Equations
The equations for the calculation of short symmetrical and unsymmetrical antennas are stated in [1]. As mentioned before, a short antenna consists of a real radiation resistor and a capacitive reactance. In accordance to this segmentation the components will be calculated in separate equations.
2.2.1.1 The Radiation Resistance
Eq. 2 calculates the radiation resistance of a short dipole antenna. The equation is valid as specified in Eq. 1. The argument of the tangent-function is placed as radius.
|
 |
2.2.1.2 The Capacitive Reactance
As mentioned before, a short dipole antenna following Eq. 1 has also a capacitive component. The equation is valid as specified in Eq. 1. The argument of the tangent-function is placed as radius.
| where: |
The calculation of the correction value XKorr,D follows these rules.
![[Image]](ant28-pics/pict12.jpg) |
![[Image]](ant28-pics/pict13.jpg) |
![[Image]](ant28-pics/pict14.jpg) |
2.2.2 Numeric Calculation
2.2.2.1 The Proof to have a Short Dipole Antenna System
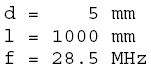
The short dipole antenna will have the following operational frequency, length and diameter of one dipole rod:
|
|
Having these parameters we must check the validation for a short dipole antenna in relation to Eq. 1. The wavelength of a frequency is calculated as:
|
|
Using Eq. 1
|
|
The dipole rod length from above and the result from Eq. 8 is put into Eq 1:
|
|
Eq. 9 proofs: The length of one antenna rod in relation to the wavelength (Eq. 7 and Eq. 8) is in compliance to Eq. 1. The antenna is a short dipole antenna system.
|
![[Image]](ant28-pics/pict19.jpg) |
2.2.2.2 Calculation of the Radiation Resistance
Now we are able use Eq. 2 to calculate the radiation resistance of the short dipole antenna. The argument of the tangent-function is placed as radius.
![[Image]](ant28-pics/pict20.jpg) |
The result for the radiation resistance is
Rs = 7.48 Ohm
Further calculations will use for radiation resistance
Rs = 7.5 Ohm
2.2.2.3 Calculation of the Capacitive Reactance
A correction value shows up in Eq. 3. Usually a table provides these values. Tables are not very convenient in the case of automatic calculation. The literature [1] provides Eq. 5 and Eq. 6 to calculate the correction value.
| Eq. 5 is valid for |
|
|
and Eq. 6 is valid for |
|
We already have calculated with Eq. 9 |
|
We have to choose Eq. 6 to calculate the correction value. |
|
The next step is to calculate the average characteristic impedance using Eq. 4. |
|
As last step we calculate the capacitive reactance of the antenna using Eq. 3. The result from Eq. 11 and the result from Eq. 12 are filled in. The argument of the tangent-function is placed as radius. |
|
XA = -994.928 Ohm
![[Image]](ant28-pics/pict28.jpg) |
2.2.2.4 Calculation of the Capacity at 28.5 MHz
| This is the equation to calculate the capacity out of the capacitive
reactance
|
|
The calculation of the capacity is done by solving the equation according to C, Xc is formally exchanged by XA
|
|
|
Together with the result of Eq. 13 we calculate the capacity at 28.5 MHz
|
|
C = 5.6 pF
2.2.2.5 Calculation Conclusion
The short dipole antenna has the parameters shown in Table 2. Also refer to Picture 1.
 |
Table 2: Antenna Parameters
We need to transform the radiation resistance from 7.5 Ohm to 50 Ohm. The capacitive reactance has to be compensated by a corresponding inductivity. At this point, one can see that the transformation of the capacitive reactance is frequency-dependent. We will see that the radiation resistance can be transformed in a wide range of bandwidth.
3. Transformation
Commercial radio frequency systems are usually based on 50 Ù. To operate the short dipole antenna, the complex impedance of the antenna must be matched into a 50 Ù system. Different transformation systems are available. I went for a transformation system using passive components. The method to perform the transformation of the real element is discussed in [2] in detail. The capacitive part of the antenna is compensated with an inductance.
3.1 Transformation of the Radiation Resistance
The description in [2] gives only the unsymmetrical form of the transformation circuit. It is easy to transfer the unsymmetrical circuit into a symmetrical circuit. The procedure is explained in [1] on page 151. Table 3 explains the calculations.
![[Image]](ant28-pics/pict33.jpg) |
Table 3: Transformation unsymmetrical/symmetrical circuits
To calculate the transformation circuit of the radiation resistor according to [2] we need to determine the cut-off frequencies. The transformation circuit shall operate between 27.5 MHz and 30.2 MHz. The final calculation results in a frequency range approximately from 25 MHz to 33 MHz. Picture 4 shows the calculated transformation circuit from 7.5 Ohm to 50 Ohm in unsymmetrical form.
Picture 4: Transformation 7.5 Ohm to 50 Ohm unsymmetrical
3.1.1 Symmetrical Circuit
In accordance to the role above, the circuit is transformed into a symmetrical form. Picture 5 shows the circuit in symmetrical form.
Picture 5: Transformation 7.5 Ohm to 50 Ohm symmetrical
In Picture 4 and Picture 5 Rs represents the radiation resistor. The resistor r1 represents a 50 Ohm termination. Inductivities are made by hand. Even non-standard values are possible. The capacitors must have standard values. The selected standard values are shown in Table 4. The inductivities are constructed as air coils and the capacitors are mica capacitors.
![[Image]](ant28-pics/pict34.jpg) |
Table 4: Exchange the calculated values into useful values
As a first approach I made the inductivities using a toroid iron powder core. The inductivity steps per turn where too large. I rejected this idea and I made the inductivities as air coils. In [3] there is a procedure to calculate air coils. That procedure was used to construct these inductors. The fine adjustment was done using a vector network analyzer directly at the operating frequency of 28.5 MHz.
3.1.2 Simulated Verification of the Symmetrical Circuit
Verification is necessary to check the circuit with regards to the standard capacitor values (Table 4). The circuit in Picture 5 (with standard values) was simulated using the software described in [7].
Picture 6 shows the simulation results of the circuit in Picture 5 using the standard capacitor values shown in Table 4.
 |
Picture 6: Simulation results of the circuit in Picture 5 (S11 is shown in dB)
3.1.3 Measuring the Symmetrical Circuit
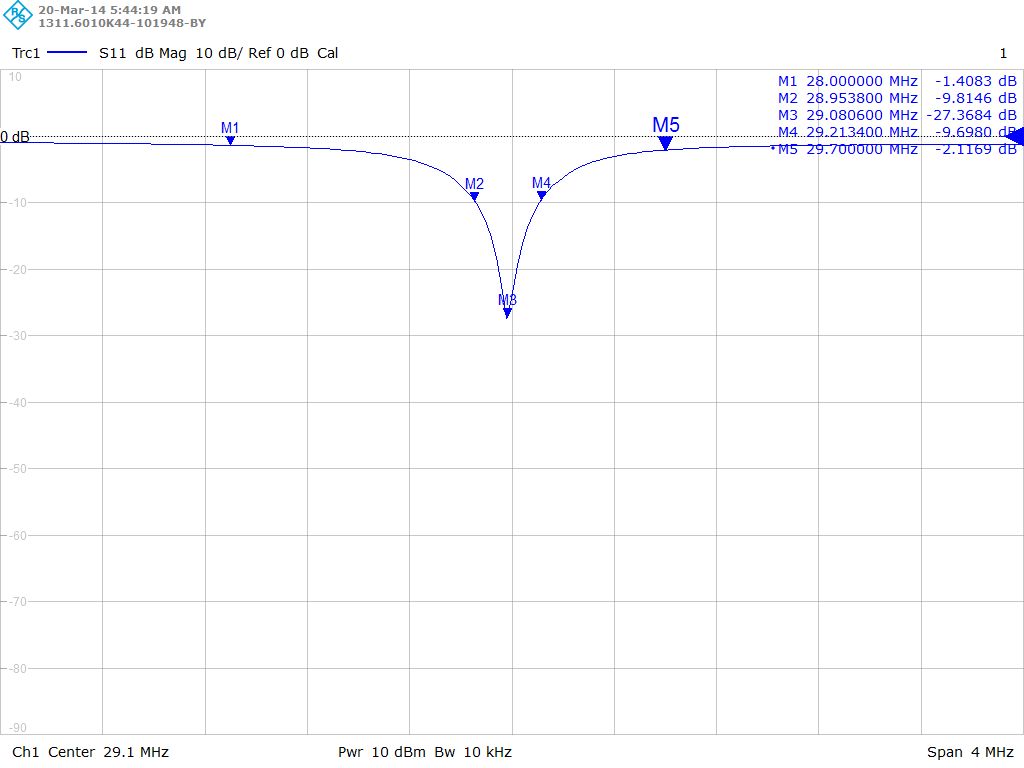
The real circuit in accordance to Picture 5 was measured using a vector network analyzer. Instead of r1 the analyzer is connected. Rs is simulated by a 7.5 Ohm resistor. Picture 7 shows the result of the S11 measurement. The U-values represent the SWR.
 |
Picture 7: Measured S11 of the circuit in Picture 5
3.2 Compensation of the Capacitive Reactance
A short antenna also consists of a capacitive reactance XA. This reactance has to be compensated. In opposite to the transformation of the radiation resistance, the compensation of a reactance is very frequency dependent (very small bandwidth). For the compensation of the capacitor we need an inductivity having the same reactance but inverse.
3.2.1 Calculation of the Compensation Circuit
The inductive reactance is calculated as shown in Eq. 17.
We know the capacitive reactance of the short antenna which was calculated in chapter 2.2.2.3
To calculate the necessary compensation inductor at 28.5MHz we have to solve Eq. 17 as shown in Eq. 18a.
![[Image]](ant28-pics/pict37.jpg) |
An inductor of 5.6 uH is necessary to compensate the capacitive component of the short antenna. 5.6 uH apply to the unsymmetrical circuit. In accordance to the role in Table 3 we need two inductivities, each 2.8 ìH for the symmetrical circuit. These inductors have been calculated as described in [3] and adjusted for 28.5 MHz using the vector network analyzer. Picture 8 shows the complete circuit to transform the radiation resistance and the capacitive reactance into a symmetrical 50 Ohm system.
Please be aware, 5.6 uH is equal to 5.6 micro Henry.
3.2.2 The Symmetrical Transformation Circuit
The inductivities L4 and L5 as well as L4’ and L5’ in Picture 8 will be combined into one coil. Finally we have to build two inductivities of 2.825 uH to substitute the series connection of two coils.
Picture 8: Complete transformation circuit (calculated values and standard values)
3.2.3 Simulated Verification of the Complete Transformation Circuit
To verify the circuit with regards to the standard capacitor values and the inductors including the compensation, the circuit of Picture 8 was simulated using the software described in [7]. The inductors are constructed as air coils and the capacitors are mica capacitors. Picture 9 shows the simulation results of the complete circuit in Picture 8 using the standard capacitor values including L4 and L5 as well as L4’ and L5’ concentrated in one coil.
The simulated verification shows a very small bandwidth around 28.5 MHz. The small bandwidth is based in the compensation of the capacitive reactance of the short antenna. The compensation used in this example is frequency dependent and therefore a narrowband compensation.
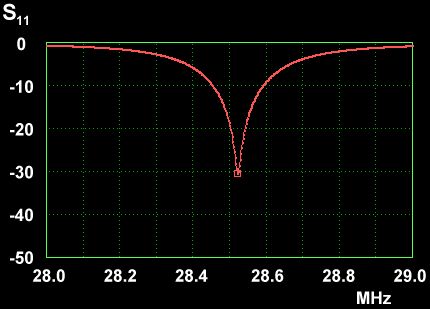 |
Picture 9: Simulation results of the circuit in Picture 8 (S11 is shown in dB)
3.2.4 Measuring of the Complete Transformation Circuit
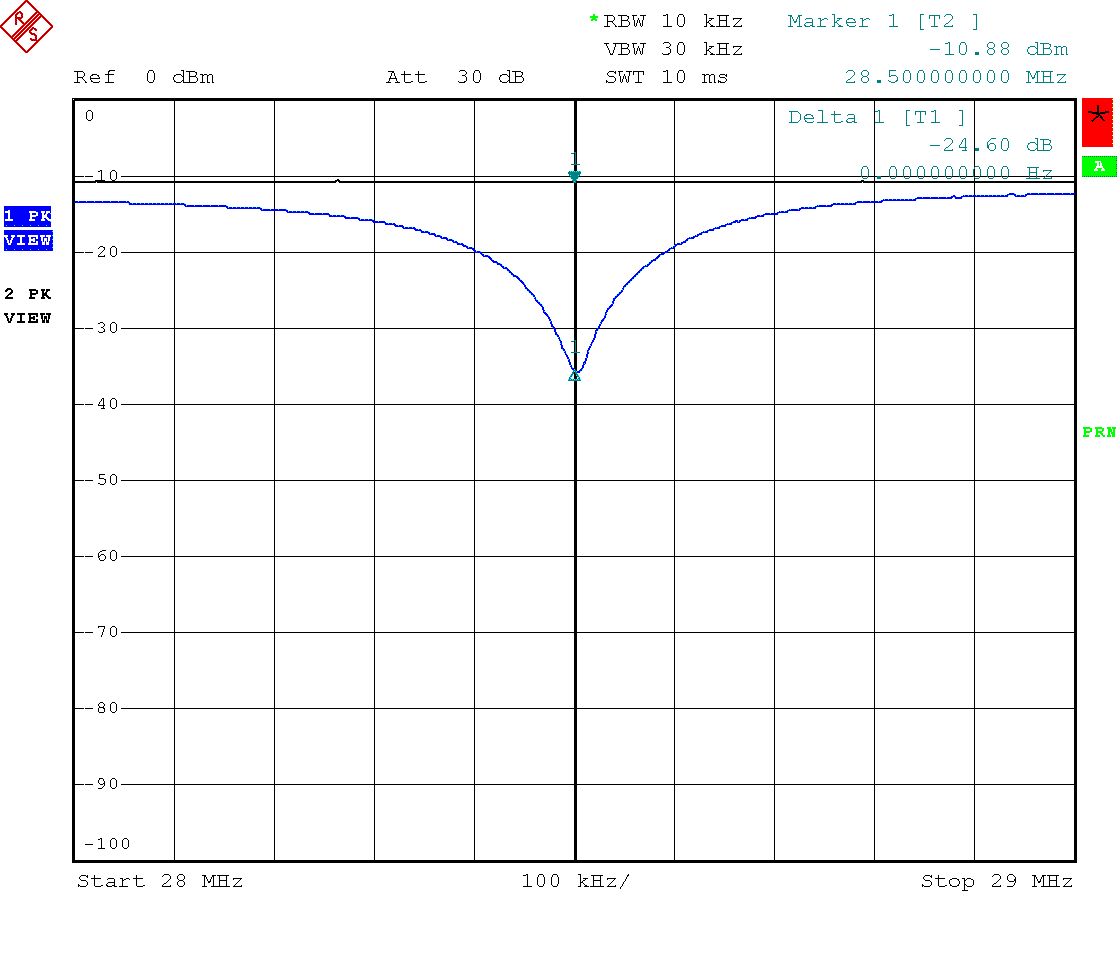
The circuit in accordance to Picture 8 was measured using a vector network analyzer. Instead of r1 the analyzer is connected. Rs is simulated by a 7.5 Ohm resistor and XA is simulated by a 5.6 pF capacitor. Picture 10 shows the result of the S11 measurement. The best match is slightly above 28.5 MHz. As expected, the overall bandwidth is about 200 kHz only (depending on the personal requirements). Please remember, the transformation bandwidth of the radiation resistor is more then 6 MHz! The limiting factor is the compensation of the capacitive reactance of the short dipole antenna.
 |
Picture 10: Measured S11 of the circuit in Picture 8
4. Antenna Build-Up
Now we are ready to build-up the short dipole antenna system that contains the antenna rods, the matching network and the BALUN. Picture 11 shows the system.
Picture 11: The antenna system
4.1 First results
The measurement shown in Picture 10 done with an antenna simulation shows a deviation of best match to higher frequencies. Now I mount the antenna rods to the matching network and the BALUN as shown in Picture 11. A new S11 measurement with the real antenna system was performed. It shows a matching point much below of the expected frequency.
4.1.1 Correction of the Matching
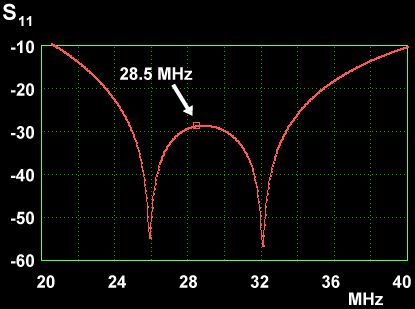
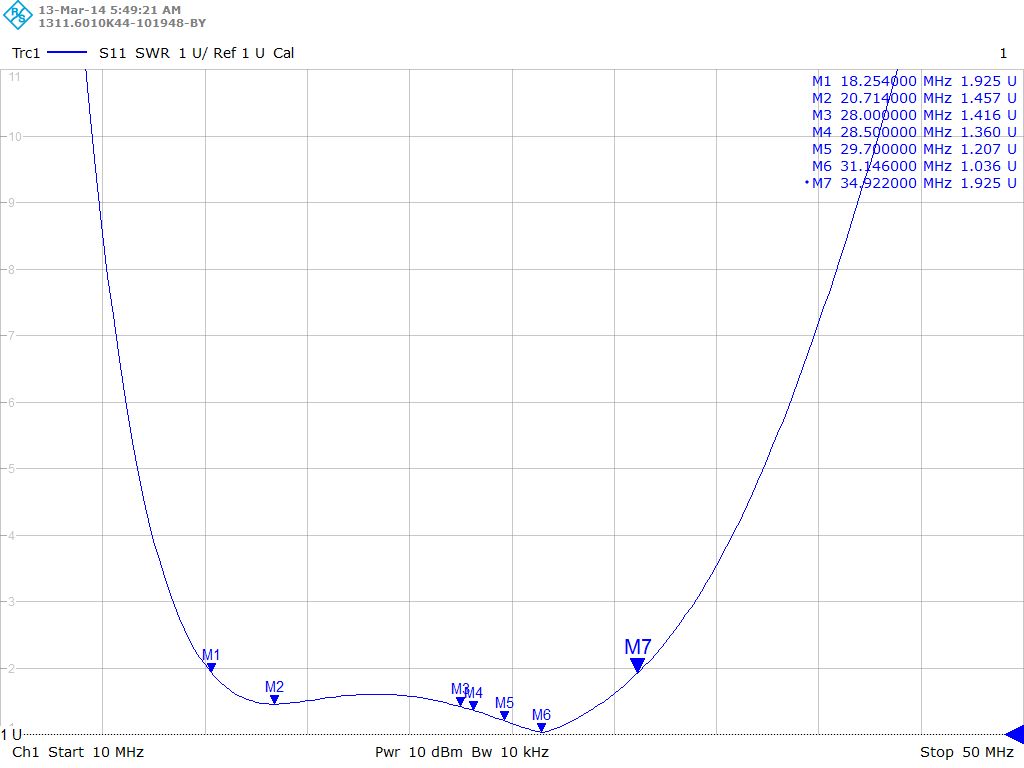
Due to the fact that the system did not have a matching point at 28.5 MHz, we have to slightly adjust the matching network. Testing the coils using test ferrite rods and rods from nonmagnetic material showed that L4/L5 have an inductivity which is too high. The inductivity of L1 is too low. A small ferrite rod was added to L1 for adjustment purpose. To adjust L4/L5, I tried to remove one turn but without success. Trying to remove again one turn without success made me use a small non-magnetic rod to adjust L4/L5. This adjustment help was successful and very precise. Now I was able to adjust the antenna to exactly 28.5 MHz. Picture 12 shows the result of the adjustment. The match at 28.5 MHz is better than –24 dB.
 |
Picture 12: Measured short dipole antenna with transformation and BALUN (S11)
4.2 Coil Data
The coils are calculated first as described in [3].
4.2.1 Coil Data for L4/L5 and L4’/L5’
Turns: 35 on 8 mm coil holder
Wire: 0.85 mm enameled copper wire (Magnet Wire)
Spacing between turns: No
Adjustment: Small non-magnetic rod
4.2.2 Coil Data for L1
Turns: 8 on 6 mm coil holder
Wire: 0.75 mm enameled copper wire (Magnet Wire)
Spacing between turns: 0.75 mm
Adjustment: small ferrite rod
5. Practical Operation
The measurement shows a match at 28.5 MHz. Based on this knowledge, the antenna was connected to a transmitter. The power was increased slowly up to 100 W. Then a two-way SSB connection had been established.
6. Conclusion and Expectation
Using the equation stated in [1] allows calculating a short dipole antenna as specified by Eq. 1. Having the data for the radiation resistance RS and the capacitive component XA, it is easy to calculate and build a matching network.
The procedure to calculate the matching network is described in [2]. Two simplified methods to calculate matching networks are described in [1]. These methods are not as flexible as the method stated in [2].
The capacitive component XA is a very small capacitor. In this case 5.6 pF. Can you now imagine how much influence a hand or a branch of a tree close to the antenna may have? A capacitor having two square plates of 25 mm * 25 mm in 1 mm distance to each other has a capacity of about 5.6 pF.
It would be interesting to know the gain of the antenna. Unfortunately a big effort is necessary to perform such a measurement. Maybe we can compare a well-known calibrated measurement antenna and the short dipole antenna. We place a generator signal at 28.5 MHz somewhere in the field. Far away in the far field we measure the field strength using a measurement receiver and a calibrated measurement antenna. We place the short dipole antenna at the same place and connect it to the measurement receiver. The differences in the field strength will give a good estimate of the antenna gain.
Appendix 1: Literatur
[1] Janzen, Gerd (1986): Kurze Antennen. Berechnung und Entwurf verkürzter Sende- u. Empfangsantennen. Stuttgart: Franckh. ISBN 3-440-05469-1
[2] Saal, Rudolf; Walter Entenmann (1988): Handbuch zum Filterentwurf = Handbook of filter design. 2. Auflage. Heidelberg: Hüthig. ISBN 3-7785-1558-6
[3] Meinke, H; F. W. Gundlach (Hrsg.) (1968): Taschenbuch der Hochfrequenztechnik. 3. Auflage. Berlin/Heidelberg/New York: Springer.
[4] Sevick, Jerry (1990): Transmission Line Transformers. 2nd Edition. Newington, CT: American Radio Relay League. ISBN 0-87259-296-0
[5] Carr, Joseph J. (2001): Practical Antenna Handbook. 4th Edition. New York: McGraw-Hill. ISBN 0-07-137435-3
[6] Reckeweg, Maik (2014): Antenna Basics. White Paper. Firmenschrift Rohde & Schwarz
[7] Wedge, Scott W.; Richard Compton, David Rutledge (1991): Puff Computer Aided Design for Microwave Integrated Circuits, Software Version 2.0; California Institute of Technology; Pasadena, California, USA
Appendix 2: Thank you
March 2015, Version 1.01: Thank you to Ralf Schwefer for corrections in grammar and orthography.
Last modification: October 17 - 2015 DF2IR

![[Image]](ant28-pics/pict16.jpg)
![[Image]](ant28-pics/pict25.jpg)
![[Image]](ant28-pics/pict26.jpg)
![[Image]](ant28-pics/pict27.jpg)